
Steps To Develop A Leak Test For Implantable Medical Devices
By Ethan Miller and Thom Wyatt, Springboard Pro

Medical device development needs robust design controls, with a crucial element being design verification, the process of objectively proving that product requirements are met. Design verification helps to ensure that the product is safe and effective for patients to use. In this article, we examine the process of design verification and specifically verification testing of an implantable medical device.
The process is often not as linear as it might seem, especially when dealing with complex medical device systems (Figure 1).
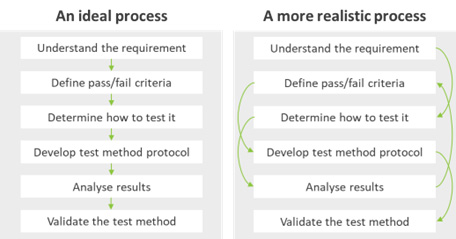
Figure 1: Verification test process development. Left: An ideal model.
Right: A more realistic process based on a real-life case study.
Take the case of an implantable device that needs to function safely and effectively 10 years after implantation. This needs to be proven to regulators, which can be particularly challenging for novel designs. Let’s say that you have identified that the encapsulation material is suitable for long-term implantation, but your risk management activities identified the possibility that a small leak can cause loss of device functionality. You’ll need to prove that the barrier remains integral. However, there is no standard approach to follow, and before setting acceptance criteria, you’ll need to understand how leak rate relates to service life. To do this, you’ll need to find a way to test for leaks.
Determining How To Test It
Helium gas can penetrate extremely small holes and is readily detectable. Helium sniffing can be used to rapidly test the seal integrity, particularly joint designs. In this process, a test part is attached to a helium leak detector, which applies a vacuum to the connected part. Helium is then sprayed around the part and a detector monitors change in helium levels, with rises indicating defects in the part’s seal integrity and identifying leak sources (Figure 2).
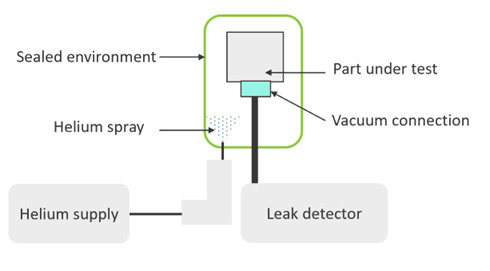
Figure 2: Schematic diagram of helium sniffing process. Helium is sprayed around the part and vacuum pressure draws it through any leak paths and into the leak detector.
However, the encapsulation is breached to get helium inside and, ultimately, it is important to non-destructively verify the barrier integrity of the representative product. In a helium bombing method, pressurized helium is forced inside the encapsulation through any existing leak paths (the “bombing” process). You can then use a helium detector to quantify the helium that is driven out of the encapsulation by a vacuum pressure (Figure 3).
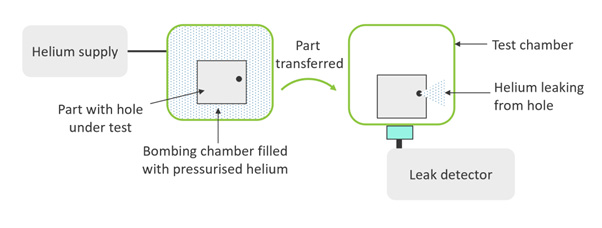
Figure 3: Schematic diagram of helium bombing process. The part is first subjected to pressurized helium, which will infuse through any holes. Next, the part is transferred to a chamber in which vacuum pressure draws out and detects any infused helium.
Analyzing Your Results And Defining Pass Criteria
At this point you still have not set acceptance criteria. An empirical way to do this is by testing samples of known leak rates, quantified using the helium bombing method. The samples could have very small, drilled holes or previously identified defects that create leak paths in the encapsulation. Placing these parts in a simulated use environment allows you to make a correlation between the rate of decrease in performance and the leak rate (Figure 4). Probabilistic modelling using this test data can establish statistical confidence for leak rate acceptance criteria after only a few months.
The next step is to determine how the acceptance criteria would be checked in production parts.
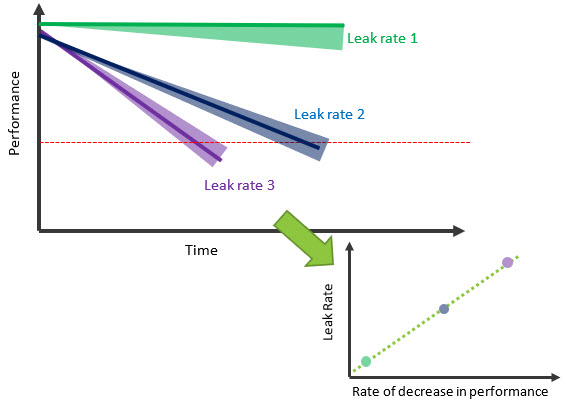
Figure 4: Establish acceptance criteria using a correlation between leak rate and rate of decrease in performance.
Helium bombing can detect small leaks but can miss very large leaks because large holes allow helium to escape rapidly. This means that there is negligible helium inside the part by the time samples are transferred to the helium detector. Additionally, detecting the smallest leaks requires a very long bombing time to ensure that enough helium is driven through tiny holes.
A series of tests can be used to cover the possible ranges of leaks and to minimize testing cycle time (Figure 5):
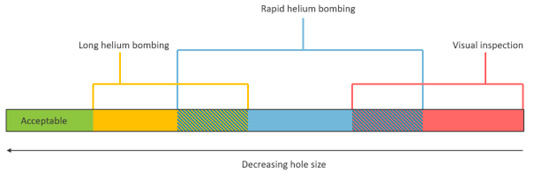
Figure 5: Different hole sizes are detected by each test method. The three-stage testing protocol detects increasingly small hole sizes, allowing you to cover the entire range of interest for possible leaks.
Stage 1: Visual inspection: Optically inspect to check for defects and to rapidly quarantine parts with relatively large holes.
Stage 2: Rapid helium bombing: Use a shorter bombing period, and quickly transfer parts to the detector to minimize loss of helium. This allows identification of defects that are too small to be seen in visual inspection but large enough that they are not detected with the longer helium bombing method. However, the short bombing period means the smallest leaks are not detected.
Stage 3: Long helium bombing: Parts that passed stage 1 and 2 move to the final leak check. Hold parts under pressure for enough time to infuse helium through very small holes. Bombing parts in parallel reduces the overall cycle time. Because we are only interested in very small leaks at this stage, any leaky parts retain helium for long enough to be detected.
You need to test the protocol with known leaky samples and edge cases to ensure that the test method is producing valid results across a representative range of parts. Once you have confidence in your test method, you can proceed to design verification and validation, and subsequently launch your product. This test process could be used in production to confirm that each part is well-sealed, or, with the support of production and test data, the production processes could be validated to demonstrate that manufactured parts are consistently well sealed.
Conclusion
We have seen how developing verification tests can be more complex than first envisioned. It is important to have a detailed technical understanding of the requirements and product to ensure that verification methods and acceptance criteria reliably prove the safety and effectiveness of your product. For novel designs, it can be necessary to think creatively about the most valuable methods of verification and to create bespoke test protocols.
 About The Authors:
Ethan Miller is a senior biophysicist at Springboard with a background in developing synthetic biological systems and high-resolution imaging.
 Thom Wyatt is a principal engineer at Springboard. He is experienced in the design and development of high-risk medical devices.